User Tools
Sidebar
Table of Contents
YOLOv8n KSNN Demo - 2
Introduction
YOLOv8n is an object detection model. It uses bounding boxes to precisely draw each object in image.
Inference results on VIM3.
Inference speed test: USB camera about 182ms per frame. MIPI camera about 156ms per frame.
Train the model
Download the YOLOv8 official code. ultralytics/ultralytics
$ git clone https://github.com/ultralytics/ultralytics
Refer README.md to create and train a YOLOv8n model. My version torch==1.10.1 and ultralytics==8.0.86.
Convert the model
Get the conversion tool
$ git lfs install
$ git lfs clone https://github.com/khadas/aml_npu_sdk
The KSNN conversion tool is under acuity-toolkit/python.
$ cd aml_npu_sdk/acuity-toolkit/python && ls
$ convert  data  outputs
Convert
After training the model, modify ultralytics/ultralytics/nn/modules/head.py as follows.
- head.py
diff --git a/ultralytics/nn/modules/head.py b/ultralytics/nn/modules/head.py
index 0b02eb3..0a6e43a 100644
--- a/ultralytics/nn/modules/head.py
+++ b/ultralytics/nn/modules/head.py
@@ -42,6 +42,9 @@ class Detect(nn.Module):

     def forward(self, x):
         """Concatenates and returns predicted bounding boxes and class probabilities."""
+        if torch.onnx.is_in_onnx_export():
+            return self.forward_export(x)
+
         shape = x[0].shape  # BCHW
         for i in range(self.nl):
             x[i] = torch.cat((self.cv2[i](x[i]), self.cv3[i](x[i])), 1)
@@ -80,6 +83,15 @@ class Detect(nn.Module):
             a[-1].bias.data[:] = 1.0  # box
             b[-1].bias.data[:m.nc] = math.log(5 / m.nc / (640 / s) ** 2)  # cls (.01 objects, 80 classes, 640 img)

+    def forward_export(self, x):
+        results = []
+        for i in range(self.nl):
+            dfl = self.cv2[i](x[i]).contiguous()
+            cls = self.cv3[i](x[i]).contiguous()
+            results.append(torch.cat([cls, dfl], 1))
+        return tuple(results)
+
If you pip-installed ultralytics package, you should modify in package.
Create a python file written as follows to export ONNX model.
- export.py
from ultralytics import YOLO
model = YOLO("./runs/detect/train/weights/best.pt")
results = model.export(format="onnx")
$ python export.py
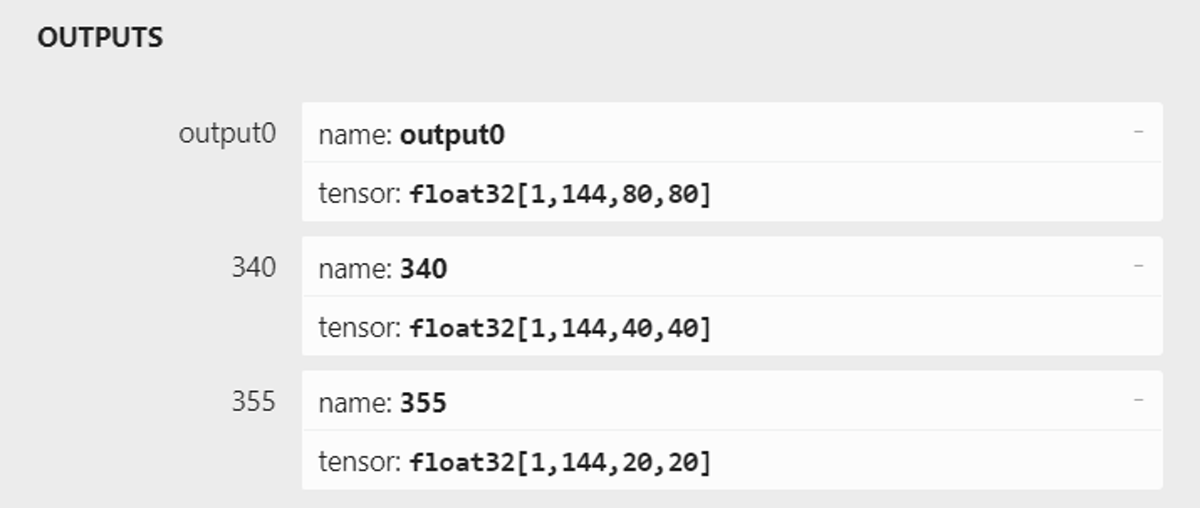
Use Netron to check your model output like this. If not, please check your head.py.
Enter aml_npu_sdk/acuity-toolkit/python and run command as follows.
# uint8
$ ./convert --model-name yolov8n \
            --platform onnx \
            --model yolov8n.onnx \
            --mean-values '0 0 0 0.00392156' \
            --quantized-dtype asymmetric_affine \
            --source-files ./data/dataset/dataset0.txt \
            --batch-size 1 \
            --iterations 1 \
            --kboard VIM3 --print-level 0
Now KSNN only supports batch-size = 1.
If you want to use more quantified images, please modify batch-size and iterations. batch-size×iterations=number of quantified images. The number of quantified images has better between 200 and 500.
If you use VIM3L , please use VIM3L to replace VIM3.
If run succeed, converted model and library will generate in outputs/yolov8n.
If your YOLOv8 model perform bad on board, please try quanfity model in int8 or int16.
# int8
$ ./convert --model-name yolov8n \
            --platform onnx \
            --model yolov8n.onnx \
            --mean-values '0 0 0 0.00392156' \
            --quantized-dtype dynamic_fixed_point \
            --qtype int8 \
            --source-files ./data/dataset/dataset0.txt \
            --batch-size 1 \
            --iterations 1 \
            --kboard VIM3 --print-level 0

# int16
$ ./convert --model-name yolov8n \
            --platform onnx \
            --model yolov8n.onnx \
            --mean-values '0 0 0 0.00392156' \
            --quantized-dtype dynamic_fixed_point \
            --qtype int16 \
            --source-files ./data/dataset/dataset0.txt \
            --batch-size 1 \
            --iterations 1 \
            --kboard VIM3 --print-level 0
Run inference on the NPU by KSNN
Install KSNN
Download KSNN library and demo code. khadas/ksnn
$ git clone --recursive https://github.com/khadas/ksnn.git
$ cd ksnn/ksnn
$ pip3 install ksnn-1.3-py3-none-any.whl
If your kernel version is 5.15, use ksnn-1.4-py3-none-any.whl instead of ksnn-1.3-py3-none-any.whl.
Install dependencies
$ pip3 install matplotlib
Put yolov8n.nb and libnn_yolov8n.so into ksnn/examples/yolov8n/models/VIM3 and ksnn/examples/yolov8n/libs
If your model's classes is not 80, please remember to modify the parameter, LISTSIZE.
LISTSIZE = classes number + 64
Picture input demo
$ cd ksnn/examples/yolov8n
$ python3 yolov8n-picture.py --model ./models/VIM3/yolov8n.nb --library ./libs/libnn_yolov8n.so --picture ./data/horses.jpg --level 0
Camera input demo
For USB camera.
# usb
$ cd ksnn/examples/yolov8n
$ python3 yolov8n-cap.py --model ./models/VIM3/yolov8n_uint8.nb --library ./libs/libnn_yolov8n_uint8.so --type usb --device 0
For MIPI camera, OpenCV do not support GSTREAMER by pip install. So you need to install OpenCV by sudo apt install.
# mipi
$ pip3 uninstall opencv-python numpy
$ sudo apt install python3-opencv
$ pip3 install numpy==1.23
$ cd ksnn/examples/yolov8n
$ python3 yolov8n-cap.py --model ./models/VIM3/yolov8n_uint8.nb --library ./libs/libnn_yolov8n_uint8.so --type mipi --device 50
0 and 50 are the camera device index.


