User Tools
Sidebar
Table of Contents

Khadas Tone1 User Manual
Thank you for purchasing a Khadas Tone1. Now you can easily enjoy Hi-Res Audio at home.
Box set
| VIMs Edition | Generic Edition |
|---|---|
| Tone1 (with 20 & 40 pin header on board) | Tone1 |
| USB Cable | USB Cable |
| Set of Screws | Set of Screws |
| - | Header: 40-Pin Female |
| - | Header: 20-Pin |

Device connection
40-Pin header connection
This connection type through 40-Pin header suitable for VIM or Edge devices.
| Step | Operation |
|---|---|
| 1 | Connect Tone1 and VIM1/VIM2/Edge-V SBC through 40-Pin Header |
| 2 | Connect RCA output |
| 3 | Connect HDMI |
| 4 | Connect DC 5V |

USB-C connection
Common connection type for PC/Smartphones and any other devices.
| Step | Operation |
|---|---|
| Step1 | Connect RCA output |
| Step2 | Connect Tone1 with PC using a USB-C data cable |

Setting Up
Most software platforms have integrated Tone1 Drivers. Only Windows platforms need to install drivers.
VIM1/VIM2/Edge
Make sure the firmware of your VIM1 is upgraded to VIM_Nougat_V180524 or later.
Make sure the firmware of your VIM2 is upgraded to VIM2_Nougat_V180413 or later.
Edge-V TBD.
Windows
We will use Windows 10 for this example. Windows 7 is similar.
- Install XMOS Driver:
- Install completed.
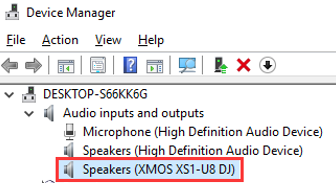
- Switch sound-card to the Tone1:
- Click the sound icon in the lower-right-corner of the Windows Task-Bar.

- Chose XMOS XS1-U8 DJ as the default sound-card.


Ubuntu
Switch sound-card to the Tone1.

MacOS
Switch sound-card to the Tone1.

Raspberry Pi
Switch sound-card to the Tone1.
- Volumio

- Raspbian
1.list sound card
$ aplay -l

2.switch sound card
$vi ~/.asoundrc

3.replace card 0 for XMOS sound card
pcm.!default {
    type hw
    card 0
}

ctl.!default {
    type hw
    card 0
}

Ports and Interfaces

| No | Ports | Function |
|---|---|---|
| 1 | USB-C | Power supply & data transmission |
| 2 | S/PDIF | S/PDIF input/output |
| 3 | L | Audio left channel output |
| 4 | R | Audio right channel output |
| 5 | 20-Pin Header | Debug Port, update XMOS firmware |
| 6 | 40-Pin Header | VIMs connector (Power supply & data transmission) |
| 7 | I2S | VIMs I2S output |
| 8 | 8 Channel Ext | XMOS 8 Channel extend |
| 9 | OLED | VIMs OLED display |
| 10 | Power LED | Power supply indicator |
20-Pin Header pin-out - J4
| Signal | Pin | Pin | Signal |
|---|---|---|---|
| VCC_3V3 | 1 | 11 | Tone_5V |
| Linux_TX | 2 | 12 | Tone_5V |
| Linux_RX | 3 | 13 | GND |
| GND | 4 | 14 | GND |
| XL_DN1 | 5 | 15 | XMOS_RST |
| XL_DN0 | 6 | 16 | XMOS_TDO |
| XL_UP0 | 7 | 17 | XMOS_TDI |
| XL_UP1 | 8 | 18 | XMOS_TCK |
| XMOS_3V3 | 9 | 19 | XMOS_TMS |
| GND | 10 | 20 | GND |
40-Pin Header pin-out - J1
| Signal | Pin | Pin | Signal |
|---|---|---|---|
| 5V_1 | 1 | 21 | GND5 |
| 5V_2 | 2 | 22 | OLED_SCL |
| VIM_DN | 3 | 23 | OLED_SDA |
| VIM_DP | 4 | 24 | GND6 |
| GND | 5 | 25 | - |
| - | 6 | 26 | - |
| - | 7 | 27 | VCC_3V3 |
| - | 8 | 28 | GND7 |
| GND | 9 | 29 | I2S_SCLK |
| ADC0 | 10 | 30 | I2S_MCLK |
| - | 11 | 31 | I2S_SDO |
| - | 12 | 32 | I2S_LRCK |
| VIM_SPDIF | 13 | 33 | I2S_SDI |
| GND3 | 14 | 34 | GND8 |
| UART_RX_AO_B / SPDIF_MODE | 15 | 35 | OLED_PWREN |
| UART_TX_AO_B / SPDIF_IN_MODE | 16 | 36 | - |
| GND4 | 17 | 37 | OLED_RST |
| Linux_RX | 18 | 38 | - |
| Linux_TX | 19 | 39 | MUTE |
| VCC_3V3 | 20 | 40 | GND9 |
I2S FPC connector pin-out - J9
| Pin | Singal |
|---|---|
| 1 | Tone_5V |
| 2 | GND |
| 3 | VCC_3V3 |
| 4 | GND |
| 5 | I2S_SCLK |
| 6 | I2S_MCLK |
| 7 | I2S_SDI |
| 8 | I2S_LRCK |
| 9 | I2S_SDO |
| 10 | GND |
Ext 8 Channel FPC connector pin-out - J3
| Pin | Signal |
|---|---|
| 1-3 | Tone_5V |
| 4-6 | GND |
| 7-8 | XMOS_3V3 |
| 9 | XMOSIO3 |
| 10 | XMOSIO2 |
| 11 | XMOSIO1 |
| 12 | ADC0 |
| 13 | VOLUME |
| 14 | XMOS_SCL |
| 15 | XMOS_SDA |
| 16 | MUTE |
| 17 | DAC_RST |
| 18 | GND |
| 19 | MCLK |
| 20 | GND |
| 21 | LRCK/DSD_CLK |
| 22 | GND |
| 23 | BCLK/DSD_1 |
| 24 | GND |
| 25 | SIN0/DSD_2 |
| 26 | SIN1/DSD_3 |
| 27 | SIN2/DSD_4 |
| 28 | SIN3/DSD_5 |
| 29 | DSD_6 |
| 30 | GND |
OLED FPC connectors pin-out - J8
| Pin | Signal |
|---|---|
| 1 | Tone_5V |
| 2 | Tone_5V |
| 3 | OLED_SCL |
| 4 | OLED_SDA |
| 5 | GND |
| 6 | - |
| 7 | OLED_RST |
| 8 | OLED_PWREN |
| 9 | - |
| 10 | GND |
FAQs
How to extend to 8-channel audio?
XMOS supports 8-channel analog line-out. However, the Tone1 DAC (ES9038Q2M) is already using 2-channels. Users can add a DAC for 8-channel expansion.