User Tools
Sidebar
This is an old revision of the document!
Table of Contents
VIM4 OS08A10 MIPI Camera
Introduction
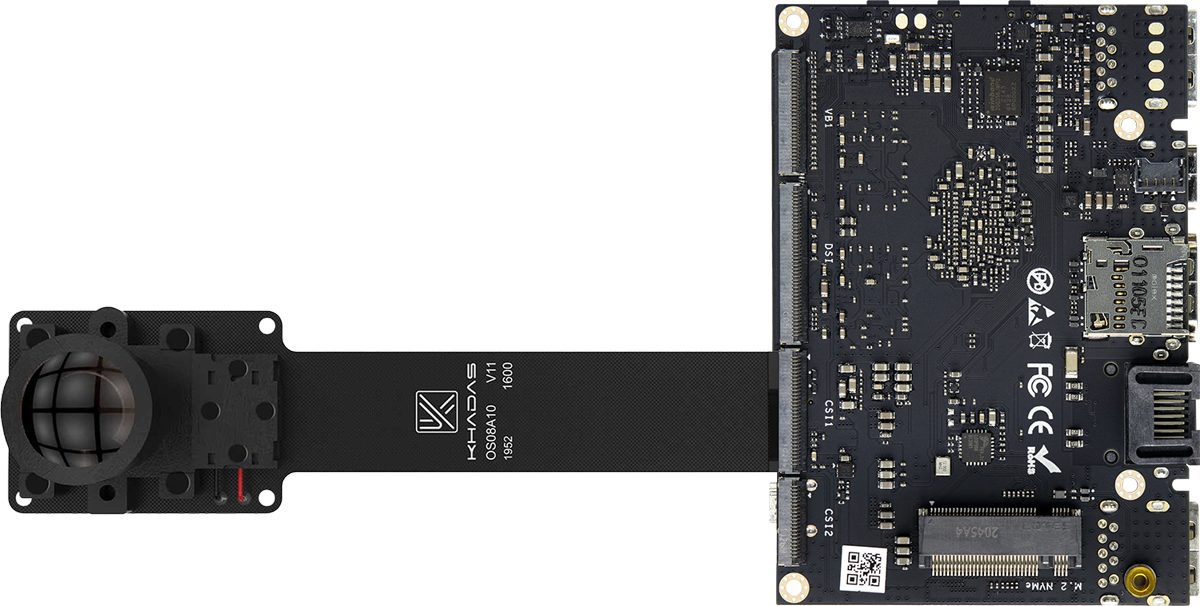
This document mainly introduces OS08A10 MIPI Camera. The document is divided into two parts,The first part of the document describes how to connect. The second part introduces How to record video via Gstreamer and test your camera under Ubuntu.
Hardware Connection
The reverse connection will damage the camera, please check the connection of the picture carefully before connecting.
Identify VIM4 Version
There are two versions of VIM4, they are VIM4 and New VIM4, as they have different ISP IP core, so the usage of MIPI camera is also different, please follow the documentation to identify your VIM4 version and choose the right documentation for your VIM4.
Please check the documentation to identify your VIM4 version.
Upgrade System
Please follow the documentation to upgrade your system to latest version.
VIM4 MIPI Camera Usage
Video Node
The video node for MIPI camera is /dev/video50.
Record Video via Gstreamer
Install Gstreamer Encoder Plugin
sudo apt update
sudo apt install gstreamer-aml
Record Video
gst-launch-1.0 v4l2src device=/dev/video50 io-mode=mmap num-buffers=300 ! video/x-raw,format=NV12 ! amlvenc bitrate=8000 ! h264parse ! qtmux ! filesink location=test_50.mp4
Record Video with OpenCV
Install OpenCV
sudo apt update
sudo apt install libopencv-dev python3-opencv
C++
Get Frame via V4l2
- mipi-camera.cpp
#include <opencv2/highgui/highgui.hpp>
#include <opencv2/imgproc/imgproc.hpp>
#include <opencv2/core/core.hpp>
#include <iostream>
#include <string>
using
namespace  cv;

using
namespace  std;

int main(int argc, char** argv)
{
    int count=100;
    string str = argv[1];
    string res=str.substr(10);
    VideoCapture capture(stoi(res), CAP_V4L2);
    capture.set(CAP_PROP_FOURCC, VideoWriter::fourcc('U','Y','V','Y'));
    capture.set(CAP_PROP_FRAME_WIDTH, 1920);
    capture.set(CAP_PROP_FRAME_HEIGHT, 1080);
    while (count)
    {
        Mat frame;
        capture >> frame;

        if (frame.empty()) {
            break;
        }
        int h = frame.rows;
        int w = frame.cols;
        const char *name = "video";
        namedWindow(name, 0);
        imshow(name, frame);
        waitKey(30);
        count--;
    }
    return 0;
}
Get Frame via Gstreamer
- mipi-camera.cpp
#include <opencv2/highgui/highgui.hpp>
#include <opencv2/imgproc/imgproc.hpp>
#include <opencv2/core/core.hpp>
#include <iostream>
#include <string>
using
namespace  cv;

using
namespace  std;

int main(int argc, char** argv)
{
    int count=100;
    string str = argv[1];
    string gstformat = "NV12";
    string gstfile = "v4l2src device=" + str + " ! video/x-raw,format=" + gstformat + ",width=1920,height=1080,framerate=30/1 ! videoconvert ! appsink";
    VideoCapture capture(gstfile);

    while (count)
    {
        Mat frame;
        capture >> frame;

        if (frame.empty()) {
            break;
        }
        int h = frame.rows;
        int w = frame.cols;
        const char *name = "video";
        namedWindow(name, 0);
        imshow(name, frame);
        waitKey(30);
        count--;
    }
    return 0;
}
Compile:
gcc -o mipi mipi-camera.cpp -lopencv_imgproc -lopencv_core -lopencv_videoio -lopencv_imgcodecs -lopencv_highgui -std=c++11 -std=gnu++11 -Wall -std=c++11 -lstdc++ -I/usr/include/opencv4
Test:
./mipi /dev/video50
New VIM4 MIPI Camera Usage
Enable Overlays
If you want to use the OS08A10 MIPI camera, you need to enable it in overlays, you need to add vim4n-os08a10 to fdt_overlays in /boot/dtb/amlogic/kvim4.dtb.overlay.env.
$ cat /boot/dtb/amlogic/kvim4.dtb.overlay.env
fdt_overlays=vim4n-os08a10
And then reboot to take effect.
Video Node
The video node is /dev/media0.
Get Frames via Mediactl API
You can get the test source code here: https://github.com/numbqq/v4l2_media_test
Download and build the test source code:
5.4 kernel
$ git clone https://github.com/numbqq/v4l2_media_test
$ cd v4l2_media_test
$ git checkout e0482794337c01935593a91b621f9c42123cf175
$ g++ v4l2_test_raw.cpp -o v4l2_test_raw  -Wall -Wno-int-to-pointer-cast -Wno-pointer-to-int-cast -pthread -fPIE -lispaml -ldl -lmediaAPI -ltuning -lm -fPIC -D_FORTIFY_SOURCE=2 -O3
$ ls v4l2_test_raw
v4l2_test_raw
5.15 kernel
$ git clone https://github.com/numbqq/v4l2_media_test
$ cd v4l2_media_test
$ g++ v4l2_test_raw.cpp -o v4l2_test_raw  -Wall -Wno-int-to-pointer-cast -Wno-pointer-to-int-cast -pthread -fPIE -lispaml -ldl -lmediaAPI -ltuning -llens -lm -fPIC -D_FORTIFY_SOURCE=2 -O3
$ ls v4l2_test_raw
v4l2_test_raw
Test:
$ ./v4l2_test_raw -p 0 -n 10 -m /dev/media0
It will capture 10 frames to file /tmp/dst_mif_0.yuv.
Preview the file:
$ ffplay -f rawvideo -pixel_format nv21 -video_size 3840x2160 /tmp/dst_mif_0.yuv

